Photoshop 101: Free Hue, Saturation and Brightness Image Assets

I recently created a few image assets to help analyse how Colour Luts and Actions can effect the Hue, Saturation and Brightness of your image.

HUE - Image Asset
Example: This Hue Colour palette below is designed with 10% shifts of Hue from 0 - 360

SATURATION - Image Asset
Example: This Saturation Colour palette is designed with 10% shifts of saturation.

BRIGHTNESS - Image Asset
Example: This Brightness Colour palette is designed with 10% shifts of brightness.

Photoshop 101: Free Photoshop Actions - DXO Styles

"Discover some of the styles below that are included in DxO Optics Pro or included in DxO FilmPack. You can apply these renderings to your photos in just one click, and you can also edit and customize them. Take a look, too, at some of the additional styles that you can download. These renderings have been carefully crafted by our Image Masters to work with all use cases — Portrait & Landscape, Black & White, Atmospheres, Single-shot HDR, etc." - http://www.dxo.com/intl/photography/styles

Recently the developers of DxO Labs released an update to DxO Optics Pro 10. This included various standardised atmospheric styles or presets. I have successfully been able to recreate these filters as Photoshop Actions. These will provide the same outcomes as using DXO Styles but in Photoshop. It is simply a one-click effect to alter the contrast, tone and saturation of your image.

WHAT IS INCLUDED IN THE ACTION SET?

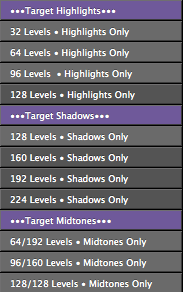
+ Atmospheres • DXO - Generates the build for the action. It creates the appropriate contrast, tone and saturation layers
Reset • Atmospheres - 
Resets the build for the action.
•Mist - A film-like matte effect
•London Night
 - a bleach bypass effect
•Blue Hour - a slight cool (blue) grade
•Twilight - a slight warm (brown) grade
•Old Film - Antique tone effect
•Polar - A monochromatic blue tinted tone
•Heather Purple - A punch of contrast with slight purple tones in the shadows
•Old Film - A warm brown desaturated antique tone

*Please be aware that when each desired effect is pressed, it will regenerate the appropriate grade.*

HOW DO I INSTALL THE ACTION INTO PHOTOSHOP?

Method #1
1. Open your downloaded folder or file and navigate to the actions file. It will end in the .atn file extension.
2. Double-click the .atn file and then open Photoshop.
3. Now the set of Photoshop actions should show up in the actions panel and should be ready to use.
To access the actions panel, simply go the top bar in Photoshop and click Window > Actions. The panel should then appear somewhere within Photoshop.

*Remember to 'Enable Button Mode' (simply navigate to the drop-down menu within the Actions Panel) so that each of the actions are instantaneous*

Method # 2
1. Start this method by opening Photoshop and navigating to the drop-down menu in the Actions Panel.
2. Next click the load actions link that is highlighted in the image above.
3.Clicking the load actions button will open your folders.
4. From there navigate to the downloaded folder with the specific Photoshop actions file you have downloaded.
5. Now select the file and click Open.
6. After all this your Photoshop actions will be visible in the Actions Panel and you are ready to start using them!

Steven Shore Quote

It seems to me that a good photographer is a combination of two things: one is interesting perceptions and the other is an understanding of how the world is translated by a camera into a photograph. You have to have something to communicate. But you also have to have a real understanding of the tools of communication in photography: that you are taking a three-dimensional world that flows in time and are going through this transformative process of making this flat, bounded, static object.

- Steven Shore

London Fashion Week 2014 - Emerging Trends

London Fashion Week 2014 - Emerging Trends

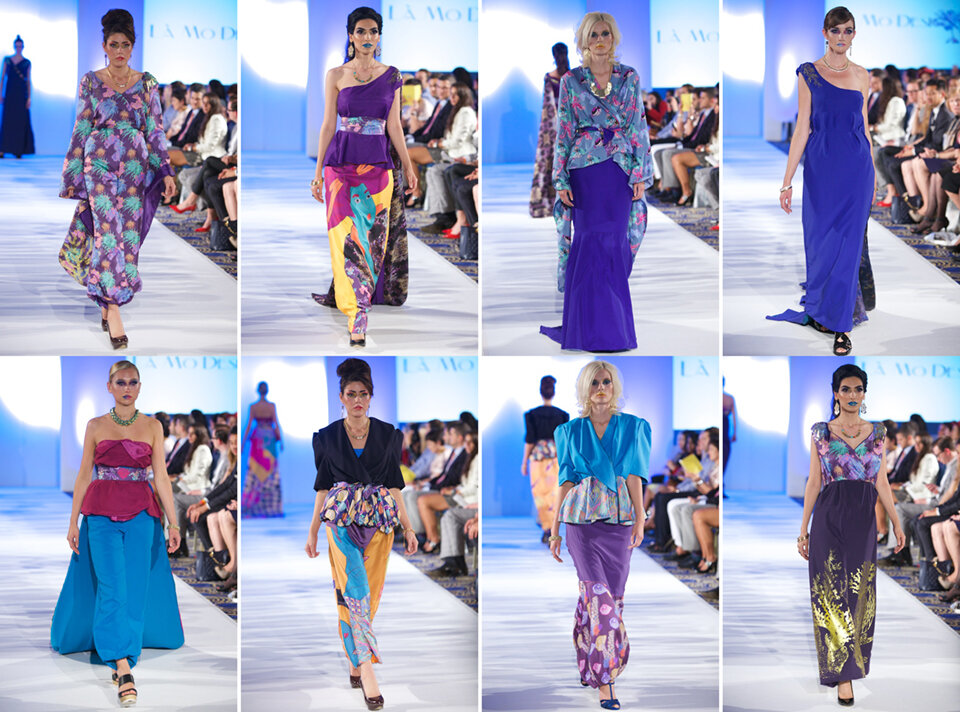
See below a variety of images from the new season collection from Azzurra (India), Fleur Kelinza (UK) and Stefan Meuwissen (Belgium), Shefali Couture (Dubai), Anya Lesnik (Germany), Leonora Asomanin (UK), Capital T by Terita Enda (Indonesia), Prieston (Hungary) and Naveda Couture (USA).

Photography by Brock McFadzean


Azzurra (India)

Fleur Kelinza (UK) and Stefan Meuwissen (Belgium)

Shefali Couture (Dubai)

Anya Lesnik (Germany)

Leonora Asomanin (UK)

Capital T by Terita Enda (Indonesia)

Prieston (Hungary)

Naveda Couture (USA)

Facebook Power Tools

The Ultimate Facebook Output Workflow for Photoshop CC and CC2014.

In this blog post, I am wishing to introduce Facebook Power Tools which was developed by Conny Walstrom. Conny is a photographer, retoucher and software developer from Sweden.

As you can see in the image below, Facebook Power Tools is a panel extension built for Adobe Photoshop CC and Adobe Photoshop CC2014. It is designed to specifically improve the quality, and reduce the time it takes to save images for Facebook.

One of the best features of the panel is that your original document isn't effected when you choose the quality of your output. If you choose to use Resize for Maximum Quality it will resize to 2048px (to the longest edge) or 960px (to the longest edge) when you choose Normal Quality. You also have the ability to add and confirm your copyright information to your file.

Being a Facebook user, you also have easier options to create profile pictures and cover photos. This is a serious add-on for any user of Facebook.

The Official Features Include:

  • Creates a merged duplicate before doing any resizing, so that you do not accidentally overwrite your original file.

  • Resizes the image without sharpening! Separate buttons to sharpen for a better result.

  • No input needed! Simply press the buttons and it will do all the hard work for you.

  • ‘Add Noise’ button to help with banding.

  • Create header and profile images with ease.

  • Warns you if you forgot to set a copyright on the image.

  • Easily edit the copyright information.

  • Separate setting for JPEGmini software – If you are hardcore serious about image quality, this is a must!


 Facebook Power Tools

DISCLAMIER NOTICE:
We are neither affiliated nor endorsed by Facebook. These tools are provided “as is” without warranty of any kind, express or implied, including but not limited to the warranties of merchantability, fitness for a particular purpose and non infringement. In no event shall the author or copyright holders be liable for any claim, damages, or other liability, whether in an action of contract, tort, or otherwise, arising from, out of or in connection with the software or the use or other dealings in the software.

Photoshop 101: How to Automate Your Workflow using Actions and Droplets in Photoshop

Actions are simply recorded tasks in Photoshop that create automated steps or parameters, which once executed, produce desired results depending on the pre-recorded steps they contain. These steps can be quite simple, for example general exposure or contrast adjustments, or something more advanced like the Frequency Separation technique setup.

Actions are designed to simply speed up your workflow and make your processing and retouching images more efficient. They give you specific options of what you would like to edit.

If you are not familiar with Actions, and the Actions panel isn’t currently in your Photoshop workspace, you can open it Window menu:

When you first open the Actions panel, there is a default set of Actions already installed in Photoshop.

To remove your default set of Actions and start creating your own custom actions, just drag the Default Actions folder onto the Trash Can at the bottom of the Actions palette.

To create a new Action Set, simply click the Folder icon next to the Play button at the bottom of the Actions palette.

To create a new Action simply click the Create New Action icon at the bottom of the Action palette.

Record your own desired adjustments after pressing the Begin Recording button.

Once all the steps of your new Action are completed hit the Stop command to finish recording your custom Action.

Make sure to  backup your custom Actions, so you don’t lose them even if your Photoshop crashes, or you get a new updated version installed on your computer. To backup your Actions, select the Action set you’d like to save, go to the drop down (wing menu) of your Actions palette, and select Save Actions. Save these out in your desired location on your hard drive (or external hard drive). Actions are typically saved out as an .atn file.

Please be aware that if you do not save your Actions, and Photoshop crashes or becomes unresponsive within the same session (after you created your new Actions), you may lose them for good. Remember to save them out to a desired location right after you created them. Once you have recorded and saved your new custom Action/Actions, close Photoshop and then reopen it. This saves new Actions in the Photoshop memory and in your Workspace.

SOME TIPS AND TRICKS WHEN WORKING WITH ACTIONS

TIPS:

  1. Open your Action palette (drop down menu) and select “Button mode”. This will allow you to instantly play each Action as a button.

  2. From the Action drop down menu, use “Insert Stop” commands to insert a pause in your Action. This enables you to adjust any settings and then re-press your Action to continue playing. For example, if one of the steps in your custom Action is adding Curves Adjustment layer, most likely you’ll need to adjust the Curve differently for each shot you work on, so inserting a stop will allow you to do that rather than playing the entire Action with pre-set adjustments.

  3. From the Actions palette drop down menu, click “Insert menu item” when the desired Action is selected – this will allow you to select any desired menu as an adjustment in the middle of a playing Action. For example, if you include insert menu item Gaussian Blur, you will be able to control the desired Radius when the Action is played.

TRICKS:

  1. When building your Actions, always work non-destructively. Start your custom Actions from creating a duplicate of the background layer, and then build your adjustments on top of it , so that you don’t work on the original background layer.

  2. As you are writing an Action, which should be run at the very beginning of your retouching, always select the background layer before building new layers or adjustments on top of it. It creates a reference point for the Action to work off.

  3. Group any important layers together into their own folders in the layer stack. For example, group Adjustments of contrast within its own folder. Keep these layers separate from other Adjustments. Keeping your Layers stack uncluttered and well-organized will help you work efficiently.

  4. Insert “Purge” command to reduce History states or memory issues when creating large and complex Actions: Photoshop > Edit > Purge > choose Histories or All

WHAT ARE BATCH COMMANDS?

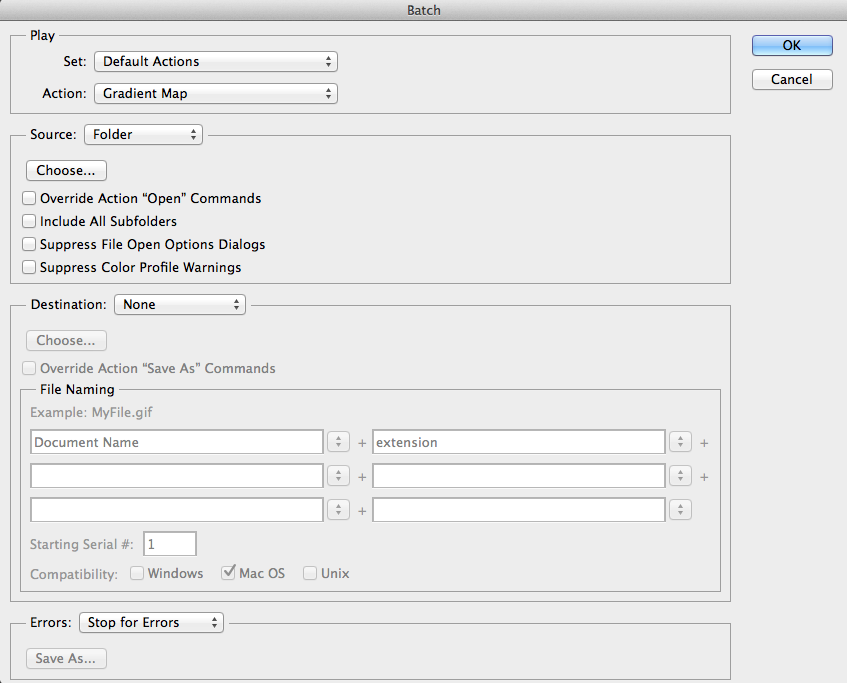
Batch Commands are automated Actions on a global scale both in Photoshop itself as well as in Adobe Bridge. To enable a Batch Command on your Actions simply go to File -> Automate -> Batch.

  1. Set – Choose the set which contains the Action you’d like to run

  2. Action – Choose the Action you’d like to run for the batch

  3. Source – Specify files you’d like to process

  4. Choose – Choose the folder containing the source files

  5. Override Action Commands – Use source files when opening (select this option if your Action contains an “open” command, and the open commands in your Actions will be ignored).

  6. Include All Subfolders – Process files in all folders within the specified source folder

  7. Suppress File Open Options Dialogs – Do not show File Open Options Dialogs

  8. Suppress Color Profile Warnings – Do not show Color Profile Warnings

  9. Destination – Final Destination of processed files; Save and Close or to a specific folder.

WHAT ARE DROPLETS?

Droplets are simply automated Actions from outside Photoshop. These work similarly to a Batch Command however can be simply run by dragging and dropping any files or folders onto a Droplet icon. To create a droplet simply go to File -> Automate -> Create Droplet

  1. Choose – Specify name and location for Droplet file

  2. Set – Choose the set which contains the Action you’d like to run

  3. Action – Choose the Action for the droplet

  4. Override Action Commands – Use source files when opening (select this option if your Action contains “open” commands. The open commands will be ignored).

  5. Include All Subfolders – Droplet will process all folders and subfolders within the chosen one

  6. Suppress File Open Options Dialogs - Do not show File Open Options Dialogs

  7. Suppress Color Profile Warnings - Do not show Color Profile Warnings

  8. Destination – Final Destination of processed files; Save and Close or to a specific folder

MY PREFERRED SETTINGS WHEN CREATING DROPLETS:

  • Save the droplet out on the desktop (or your designated folder for custom Actions) for easy access and use.

  • Uncheck or disable Override Action “Open” Commands

  • Check or enable Include All Sub-folders

  • Check or enable File Open Options Dialogs

  • Check or enable Color Profile Warnings

Retouching 101: Retouching Considerations and Guidelines

The general term “Retouching” can be categorised under the following subject-specific areas of Portrait, Editorial, Commercial, Beauty and Creative Retouching.

Each of these areas possesses its own assembly of considerations around what “retouching” is when editing the image in question. In other words, the decisions and actions one undertakes when editing in the area of “Portrait” will be different from those undertaken when editing an image in “Beauty”.

So how does one determine the category (and its implicit techniques and time allocations) to be applied to any image?­­­ The following questions can help you evaluate which category your image falls under and how much time is needed to retouch each image.­­

1. Who is the client and what is the image to be used for?

2. How many images are to be retouched and delivered?

If you can answer both of these questions before you begin retouching it will give you an outline as to what is required and how long you should spend on each image.
As mentioned above, each retouching “category” will still have its own set of reference points that will need to be followed if one is to achieve the desired end result.

PORTRAIT RETOUCHING

With regards to Portrait Retouching, we typically try and keep all of the personal qualities and characteristics of the person intact. The image should appear as natural as possible, as if it hasn’t been retouched. Headshots and Model Tests are generally considered in this category, as they require depicting the subject as naturally as possible for them to be given potential work based on their natural appearance.

We try to leave all permanent features like scars, freckles, and moles alone. Depending on the image, you may wish to emphasise these or reduce the intensity of these features on the image you are working on. However non-permanent features like pimples, redness of skin, bruises should be cleaned up and removed.

The skin is generally left intact apart from removing non-permanent features.

Please keep in mind that if you are wishing to improve the skin texture, add contrast, adjust colour correction and sharpen the image; keep it subtle. Do not detract from the original image or depiction of the subject.

EDITORIAL RETOUCHING

With regards to Editorial Retouching, we once again try to keep the image as natural as possible and only remove distracting elements. This form of retouching typically needs to sell a product or service as the images are commonly used for lookbooks/editorials/advertising in magazines or publications.

We try to remove all permanent features like scars, freckles and moles. However we tend to reduce the intensity of wrinkles and adjust any skin discolorations within the image. Typically the skin is cleaned however it is not excessively evened out.

Editorials are typically a series of images. Adjustments of contrast, colour correction and the chosen grade of the image all need to match and be consistent across all images.

COMMERCIAL RETOUCHING

Similar to Editorial Retouching, Commercial Retouching is typically used to sell a service or a product. The main difference between the two categories is that the viewer needs to be able to relate to the subject on a personal level.

Once again, we remove all distracting elements. Depending on what this means in any image it can take a number of hours to complete. While each image will have its own considerations in terms of this element, one cannot forget that the client will also have their own requirements about how the final image should look. The important thing to remember here is that the collection of images needs to have a level of consistency above all else.

BEAUTY RETOUCHING

We try to remove all permanent “imperfections” within the image. Typically the skin is flawlessly cleaned and evened out. For a more highly polished look additional dodging and burning is used.

Depending on what is required for the image, beauty retouching can easily take more then 4 hours per image to complete.

CREATIVE RETOUCHING

Unlike the other forms of retouching, Creative Retouching is seen as an artwork or a particular creative vision rather then depicting “the truth” about a subject. Compositing multiple image or elements fall under this category as they can create different realities or imaginative realms that can’t be achieved from a single image. Thus this work will be the most time intensive and demanding in terms of ensuring that the image as it is “built” and completed still maintains its own integrity as an image.